The matcha market is set to double to 9 Billion by 2030, with an estimated 20 million people drinking it daily. The Problem? There is no keurig equivalent, no machine which provides matcha at the touch of a button
I took this idea for an all in one machine from napkin sketch to prototype in just 3 months. I wanted to quickly get to an MVP which provided the same consistency and foam as a normal matcha shot.
Design
I started the napkin sketch phase as I always do:
Patent Research
Open source docs
Technical Papers
From there, I had a few problems to deal with. First, most consumer hardware is injection molded. This is mainly for cost savings, but also the cheapest way to make complex food safe parts. Since low volume injection molding is still very cost prohibitive, I designed this prototype to use CNC for all food safe parts. Additionally you’ll see aluminum extrusions used for a box shaped base. This was done for speed of design and assembly.
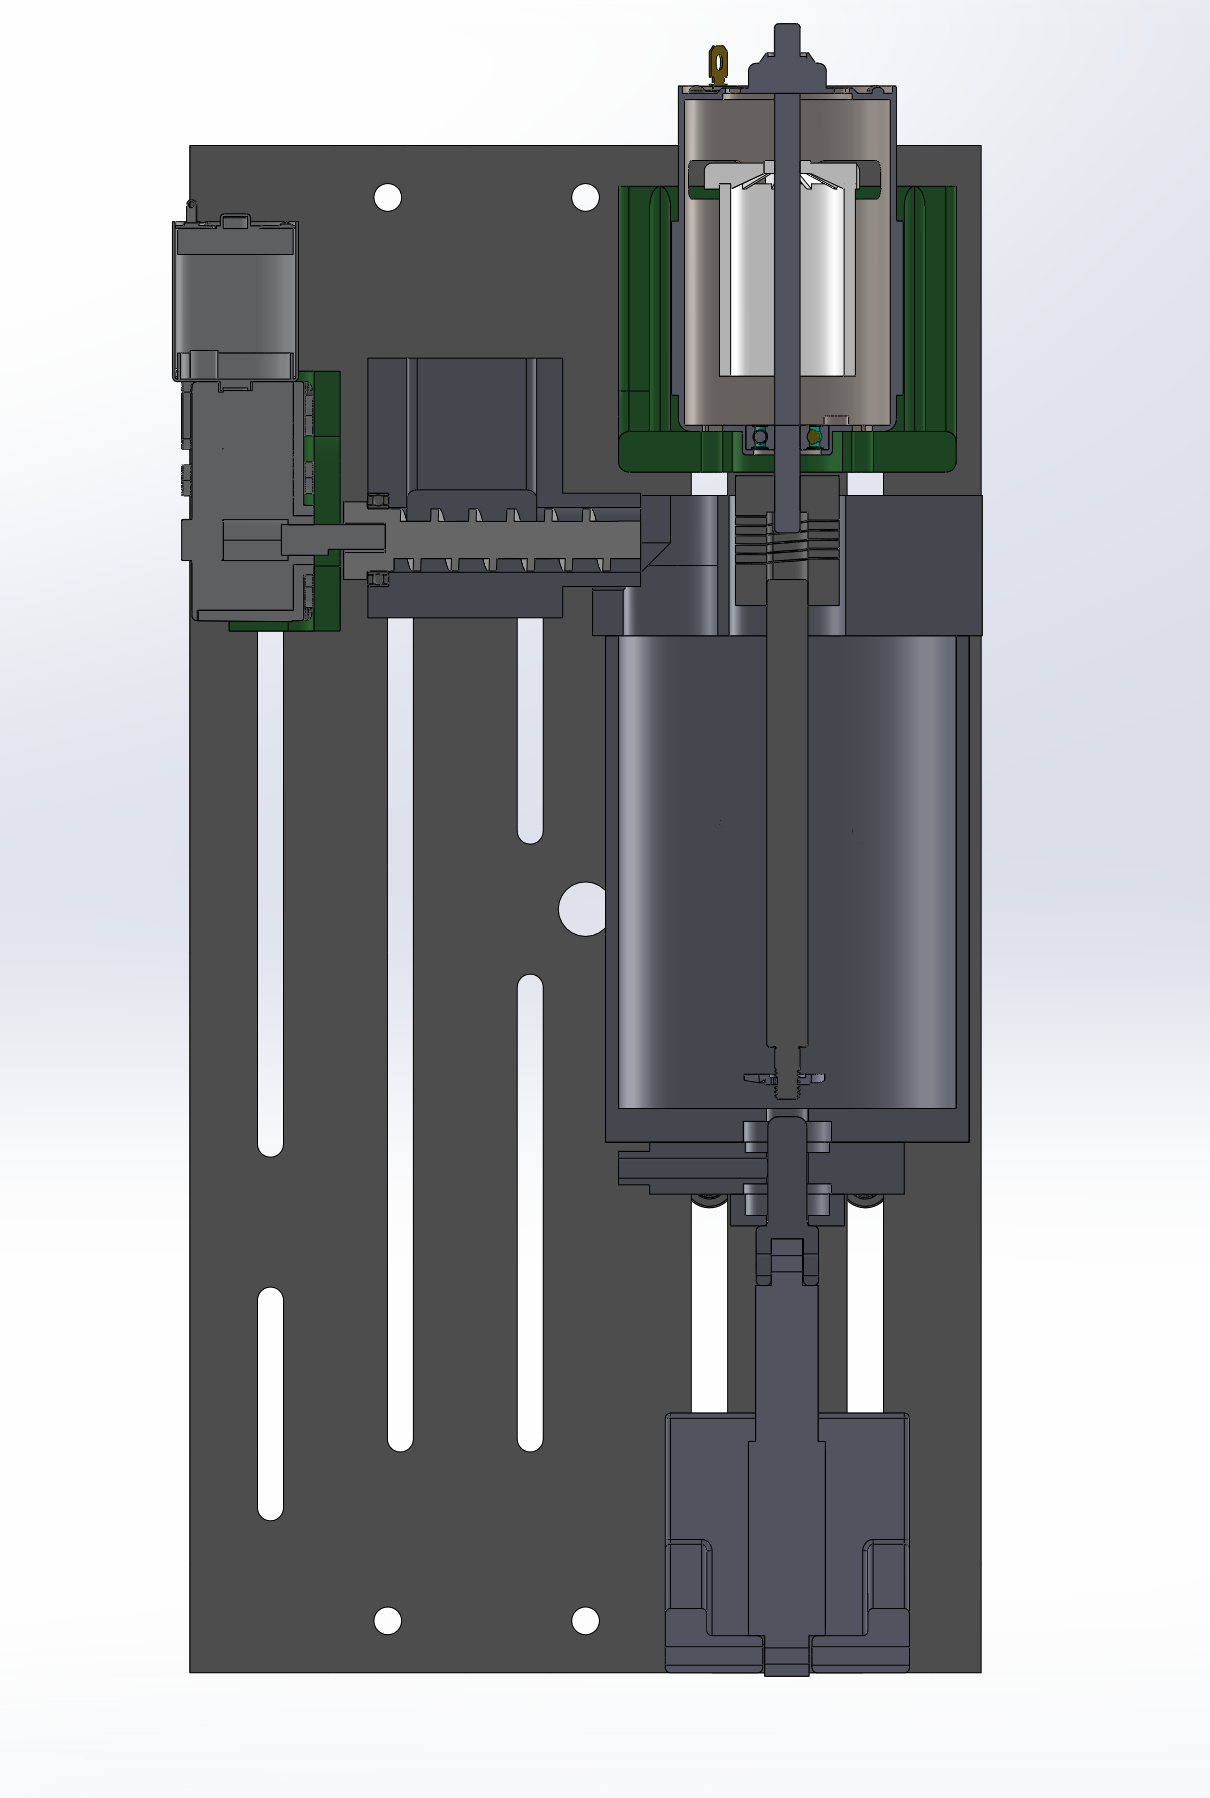
The main IP of this machine lies in the mixing chamber geoemtry, inlet and outlets, and heating. I designed, simulated, and built 6 potential mixing chamber designs, along with 5 different mixing head geometries. Since this is an on going project for me with real market potential, I will not dive deep into the weeds here. I have attached a photo with some geometry omitted, so you can get a sense of the basic design.
Skeleton CAD
Firmware
For the electronics side of things, I went with a skeleton PCB. For the first prototype, I just wanted to prove consistency and foam levels. So it really didn’t make sense, for the sake of time, to design, test, and prototype a custom pcb board.
For the brains I choose the ESP32 to allow for OTA updates and remote diagnostics on heating temps, flow rates, etc.
For the firmware I choose ESPAsyncWebServer, an open source wifi-enabled host. The web server sets up mutliple HTTP endpoints that map to specific functions on the machine, so I can control and test from across the room. There are also manual controls enabled, which allow for one shot (short press), or an automated cleaning flush (long press). Most of the code is pretty basic compared to stuff I’ve written (neural networks, MPC, etc).
voidloop(void){//Readbuttonstate(LOWwhenpressedduetopull-up)boolbuttonPressed=(digitalRead(BUTTON_PIN)==LOW);//Buttonpressdetectionif(buttonPressed&&!buttonWasPressed){//ButtonwasjustpressedbuttonPressStartTime=millis();buttonWasPressed=true;}elseif(!buttonPressed&&buttonWasPressed){//ButtonwasjustreleasedunsignedlongpressDuration=millis()-buttonPressStartTime;if(pressDuration>=LONG_PRESS_DURATION){//Longpressdetected-startflushsequenceif(currentFlushState==FLUSH_IDLE){currentFlushState=FLUSH_PUMP_IN;flowSensor.resetTotalVolume();//ResetvolumecounterSerial.println("Flush sequence started via long press");}}else{//Shortpressdetected-startrelaysequencefirstSerial.println("Button pressed! Starting relay sequence");brewButtonRelayTimer=millis();brewButtonRelayActive=true;//StartbrewingprocessafterrelaysequencetemperatureControlEnabled=true;manualPumpControl=false;//ResetmanualcontrolwhenstartingbrewingprocesscurrentBrewingState=IDLE;//Resetbrewingstatetostartfrombeginning}buttonWasPressed=false;}blinkLED(LED_PIN,500);//BlinkLEDevery500ms//Handleflushsequencestatemachineswitch(currentFlushState){caseFLUSH_IDLE://Donothing,waitingforsequencetostartbreak;caseFLUSH_PUMP_IN://RunpumpinuntiltargetvolumeisreachedrelayControl.setRelayState(25,HIGH);//PumpINONif(flowSensor.getTotalVolume()>=TARGET_VOLUME){relayControl.setRelayState(25,LOW);//PumpINOFFcurrentFlushState=FLUSH_STIR;flushTimer=millis();relayControl.setRelayState(27,HIGH);//TurnonStirMotor}break;caseFLUSH_STIR://Runstirmotorfor5secondsif(millis()-flushTimer>=FLUSH_STIR_TIME){relayControl.setRelayState(27,LOW);//StirMotorOFFcurrentFlushState=FLUSH_PUMP_OUT;flushTimer=millis();relayControl.setRelayState(26,HIGH);//TurnonPumpOUT}break;caseFLUSH_PUMP_OUT://Runpumpoutfor8secondsif(millis()-flushTimer>=FLUSH_PUMP_OUT_TIME){relayControl.setRelayState(26,LOW);//PumpOUTOFFcurrentFlushState=FLUSH_IDLE;flowSensor.resetTotalVolume();//Resetvolumecounter}break;}//Handlebrewingprocessstatemachineif(temperatureControlEnabled&&!manualPumpControl){//OnlyrunifnotinmanualcontrolfloatcurrentTemp=readThermistor();switch(currentBrewingState){caseIDLE://StartthebrewingprocesscurrentBrewingState=HEATING;ssrControl.setTemperatureThreshold(TARGET_TEMP);break;caseHEATING://UseSSRControltomaintaintemperaturessrControl.update(currentTemp);if(currentTemp>=TARGET_TEMP){currentBrewingState=PUMPING;pumpPulseTimer=millis();//Initializepumppulsetimer}break;casePUMPING://ContinuemaintainingtemperaturewhilepumpingssrControl.update(currentTemp);//HandlepumppulsingunsignedlongcurrentPumpTime=millis();unsignedlongpumpElapsedTime=currentPumpTime-pumpPulseTimer;unsignedlongpumpCycleTime=pumpElapsedTime%(PUMP_ON_TIME+PUMP_OFF_TIME);if(pumpCycleTime<PUMP_ON_TIME){relayControl.setRelayState(25,HIGH);//PumpON}else{relayControl.setRelayState(25,LOW);//PumpOFF}if(flowSensor.getTotalVolume()>=TARGET_VOLUME){relayControl.setRelayState(25,LOW);//EnsurepumpisoffrelayControl.setRelayState(33,HIGH);//TurnonAugeraugerActive=true;augerTimer=millis();currentBrewingState=IDLE;temperatureControlEnabled=false;//EndthebrewingprocessflowSensor.resetTotalVolume();//Resetthetotalvolumecounter}break;}}else{//OnlyturnoffSSRwhencontrolisdisableddigitalWrite(12,LOW);//Pin12isthedefaultSSRpincurrentBrewingState=IDLE;}//Checkifaugertimerhasexpiredif(augerActive&&(millis()-augerTimer>=20000)){relayControl.setRelayState(33,LOW);//TurnoffAugerafter2secondsaugerActive=false;//StartstirmotorsequencerelayControl.setRelayState(27,HIGH);//TurnonStirMotorstirMotorActive=true;stirMotorTimer=millis();stirMotorPulseCount=0;}//Handlestirmotorpulsingif(stirMotorActive){unsignedlongcurrentTime=millis();unsignedlongelapsedTime=currentTime-stirMotorTimer;unsignedlongcycleTime=elapsedTime%(STIR_MOTOR_ON_TIME+STIR_MOTOR_OFF_TIME);if(stirMotorPulseCount<STIR_MOTOR_PULSE_COUNT){if(cycleTime<STIR_MOTOR_ON_TIME){relayControl.setRelayState(27,HIGH);//MotorONstirMotorPulseCounted=false;//Resetcountflag}else{relayControl.setRelayState(27,LOW);//MotorOFFif(!stirMotorPulseCounted){stirMotorPulseCount++;stirMotorPulseCounted=true;Serial.print("Stir motor pulse count: ");Serial.println(stirMotorPulseCount);}}}else{//We've completed all pulsesrelayControl.setRelayState(27,LOW);//EnsuremotorisoffstirMotorActive=false;Serial.println("Stir motor sequence complete");//StarttheexitvalvesequencerelayControl.setRelayState(32,HIGH);//TurnonexitvalverelayvalveRelayActive=true;valveRelayTimer=millis();//SetH-bridgeforOPENdigitalWrite(22,LOW);digitalWrite(23,HIGH);relayControl.setRelayState(23,LOW);relayControl.setRelayState(22,HIGH);}}//Handlevalveandpumpoutsequenceif(valveRelayActive){unsignedlongcurrentTime=millis();unsignedlongelapsedTime=currentTime-valveRelayTimer;//Allowpumpouttohappenregardlessoftemperaturecontrolstateif(elapsedTime>=VALVE_OPEN_TIME&&!pumpOutActive){relayControl.setRelayState(26,HIGH);//Usepin26forPUMPOUTpumpOutActive=true;}if(elapsedTime>=(VALVE_OPEN_TIME+PUMP_OUT_TIME)){relayControl.setRelayState(32,LOW);//Turnoffexitvalveif(pumpOutActive){relayControl.setRelayState(26,LOW);//TurnoffPUMPOUT(pin26)pumpOutActive=false;}valveRelayActive=false;}}//Updateflowsensorreadingseverysecondusingnon-blockingtimerif(millis()-flowSensorTimer>=FLOW_SENSOR_INTERVAL){currentFlowRate=flowSensor.readFlowRate();flowSensorTimer=millis();}//Handlebrewbuttonrelaycontrolif(buttonWasPressed&&!brewButtonRelayActive){brewButtonRelayTimer=millis();brewButtonRelayActive=true;}if(brewButtonRelayActive){unsignedlongcurrentTime=millis();unsignedlongelapsedTime=currentTime-brewButtonRelayTimer;if(elapsedTime>=BREW_BUTTON_RELAY_DELAY&&elapsedTime<(BREW_BUTTON_RELAY_DELAY+BREW_BUTTON_RELAY_DURATION)){relayControl.setRelayState(32,true);//Turnonrelay}elseif(elapsedTime>=(BREW_BUTTON_RELAY_DELAY+BREW_BUTTON_RELAY_DURATION)){relayControl.setRelayState(32,false);//TurnoffrelaybrewButtonRelayActive=false;}}
Testing
Even though Testing and Design are two separate headers in this project, they occured simultaneously. This is a core belief of mine: that design and hardware testing must be intertwined. Often these are separated which leads to delayed feedback loops.
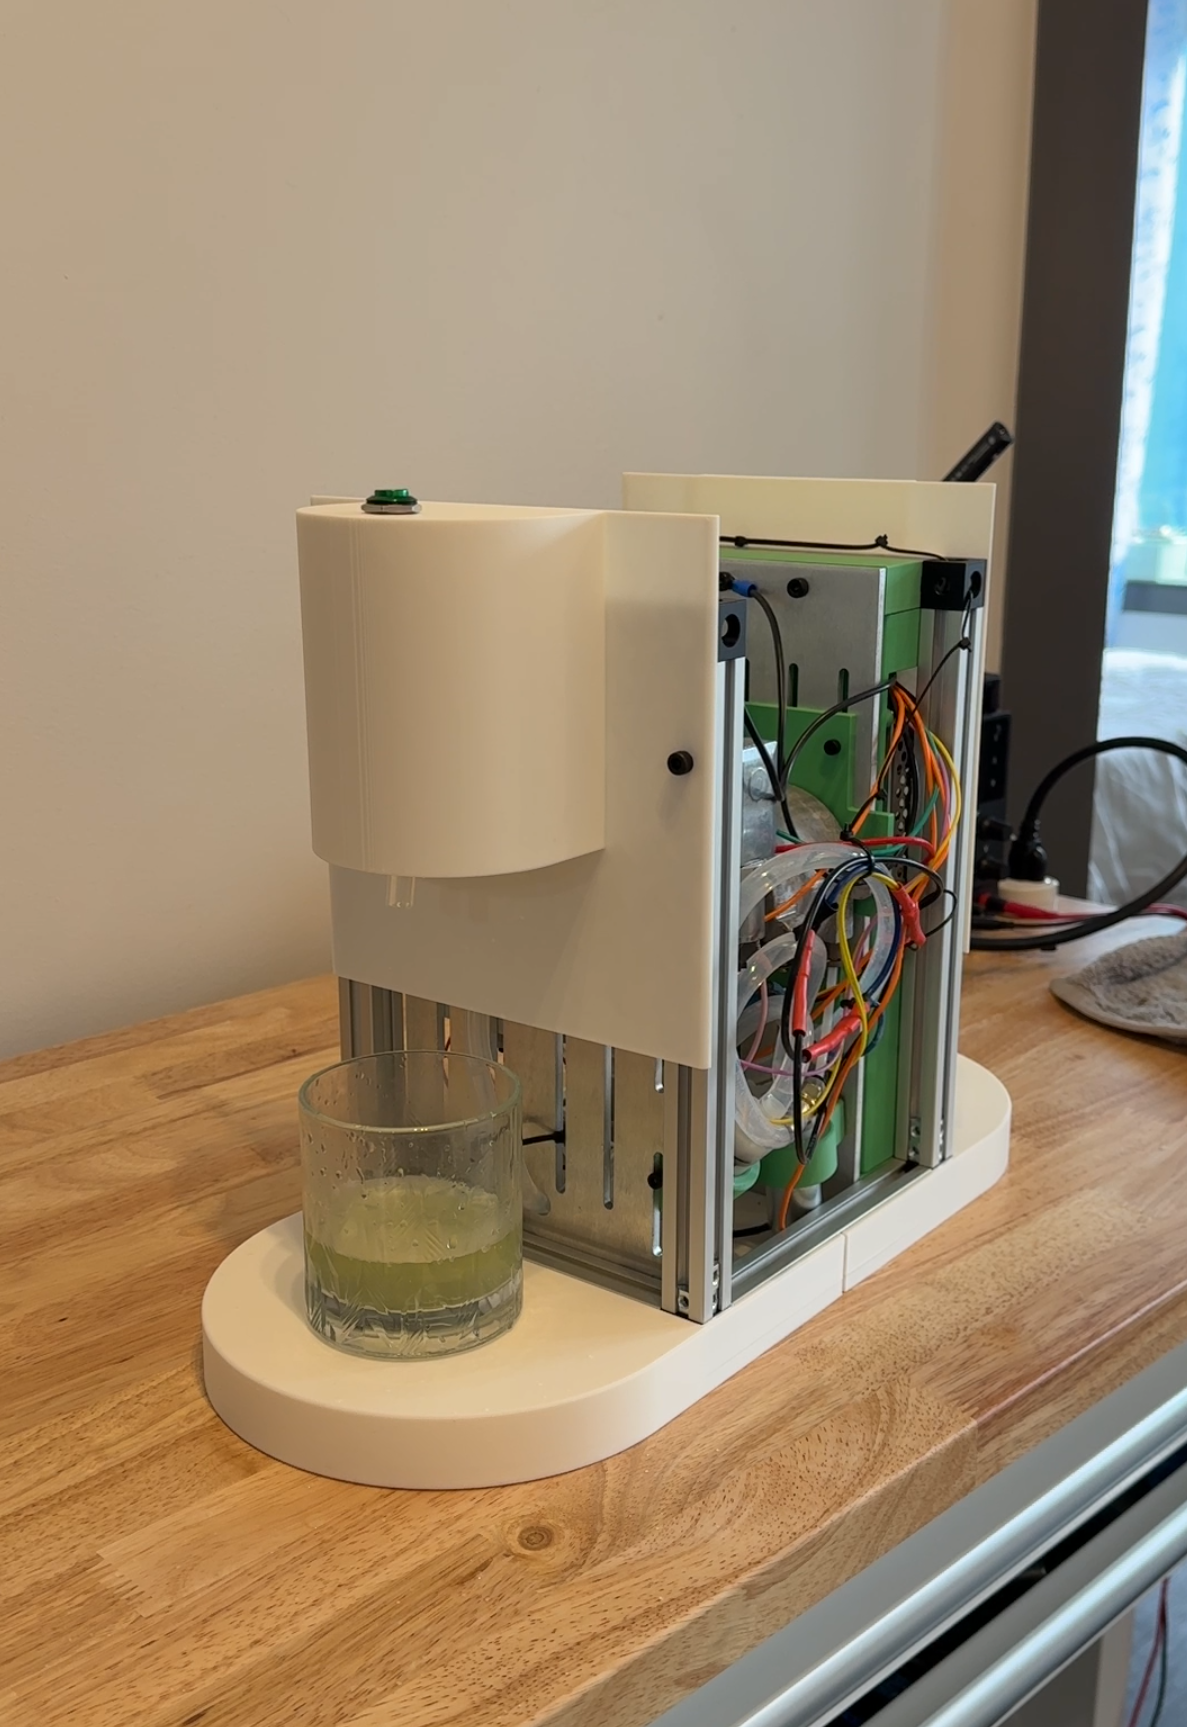
For initial testing I focused on shot temperature, foaming, and consistency. With some tweaking of the thermoblock (heating element) and the dosing mechanism, I was getting consistent matcha shots everytime!
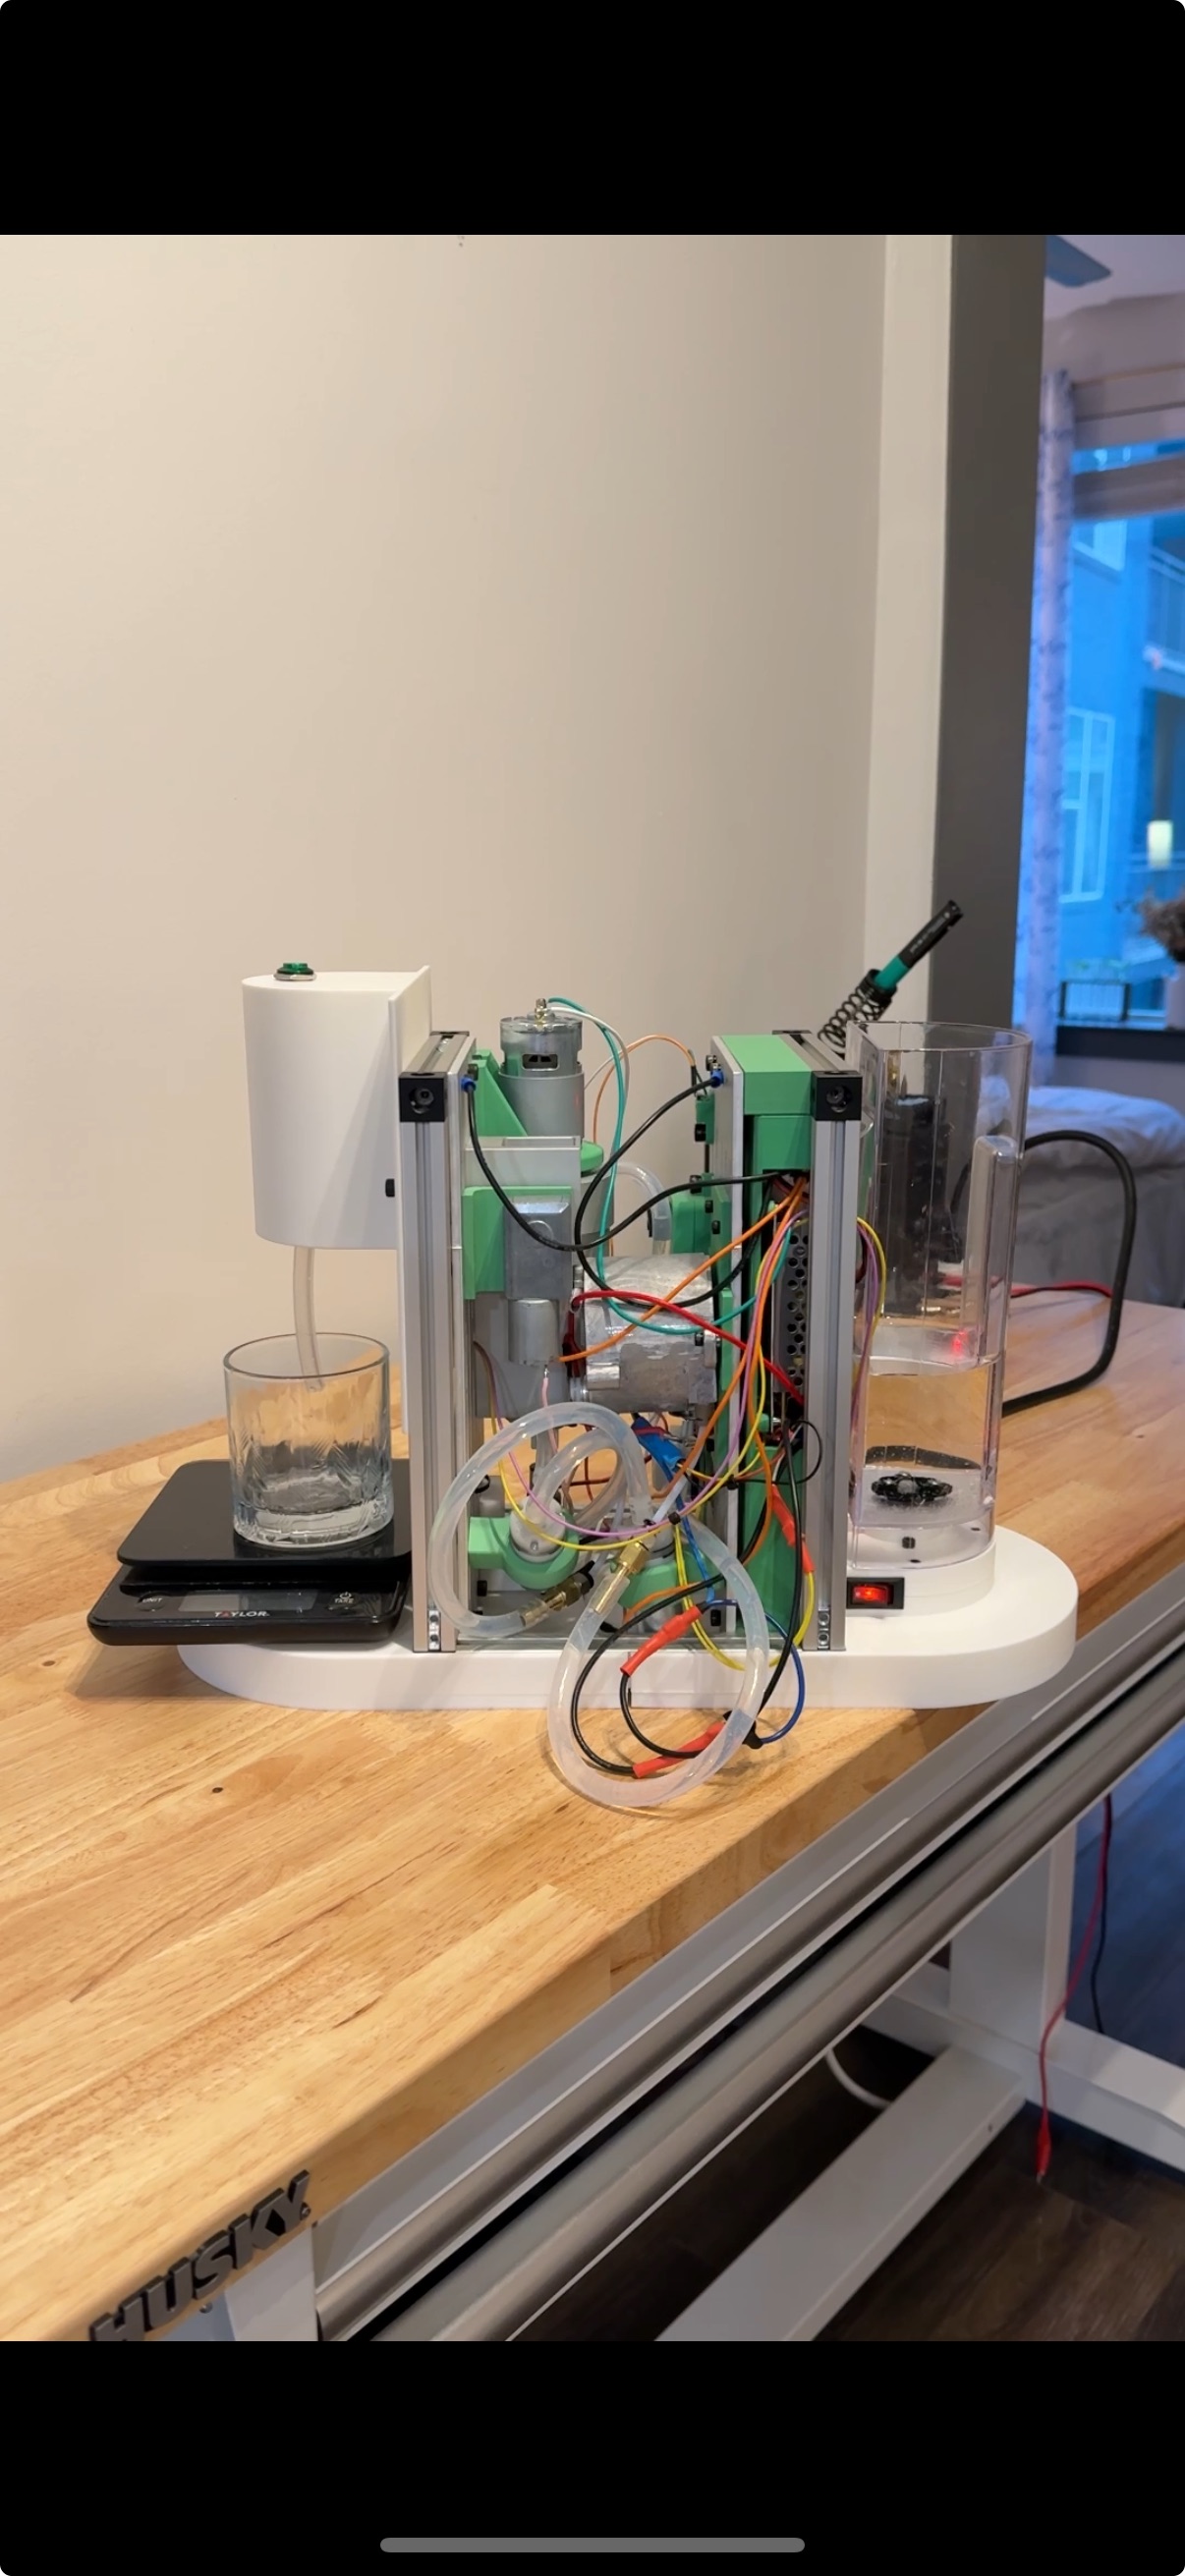
Skeleton Assembly
First Shot
No Foam Test
Future Plans
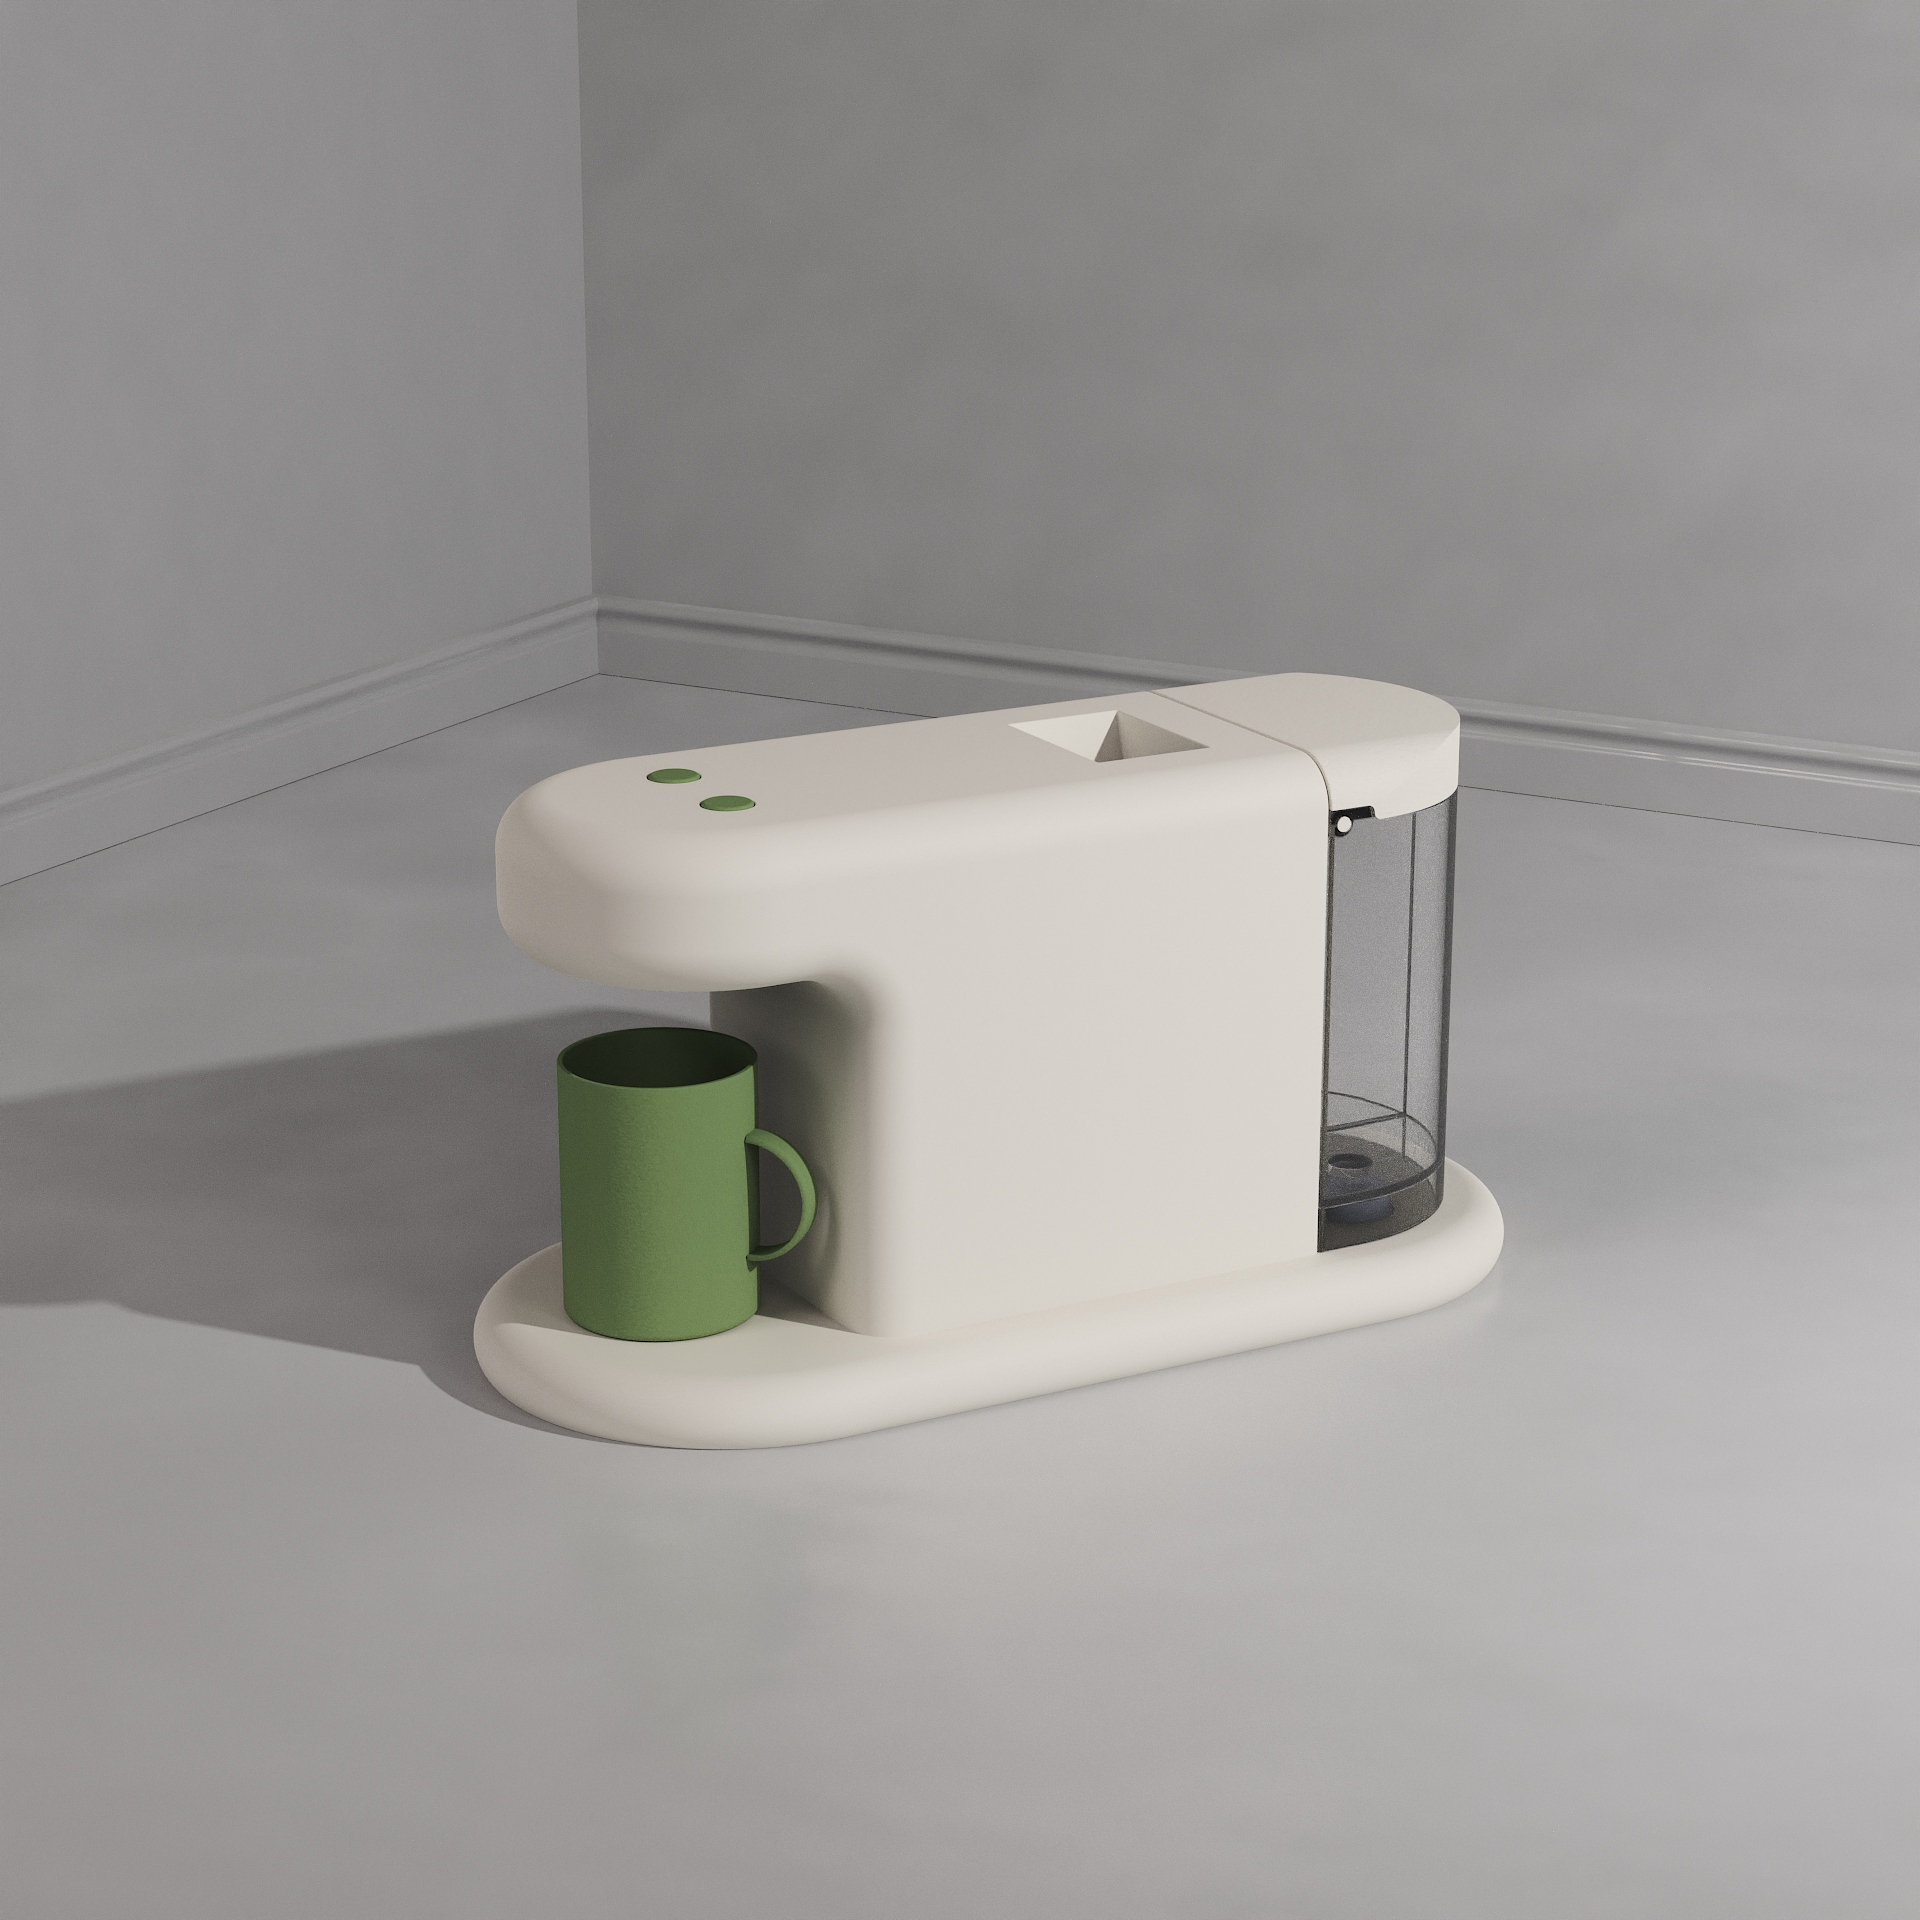
I am now focused on an injection molded design, which allows for mass manufacturing. This reworked design will feature multiple improvements:
Integrated waste water container - built in flushes prevent dirty shots
Single or double shot buttons - no power button, auto on
Easy access hopper - allows for dumping an entire tin of powder
Below you can see a rough CAD of what the injection molded product will resemble. I took inspiration from the cloud plates and mugs that have gone viral recently.